Jul 6, 2022

Understanding S/4 HANA Adobe Forms for Functional Consultants

SAP has used over the past (many) years different technologies and development languages to build outputs / printouts for different processes (Ex. PO printout, Customer Invoice and/or Check printing and many more too). Some of these technologies can still be used if you want, but now a days you have better, easier and a more robust technology that can be used. This is Adobe Lifecycle Forms in S/4 HANA or some call them Adobe forms.

In the past, we used to do many of these mentioned outputs with SAPScript technology. These was ok for that time, but it is a little bit of a tedious language and adjusting drawings and positions takes a lot of try & error and definitively not really user friendly. Also, if you needed extra information that was not part or accessible in the original SAP delivered form; you most likely needed to create a "custom print program" to be able to accommodate the extra info or logic needed. We all know by know what custom means in terms of future upgrades and maintenance costs ...

Then after SAPScript came Smartforms, which it was the 1st possibility of dealing and producing Adobe PDF type of outputs. I worked with it a bit, but unfortunately being a Finance consultant I still had to deal with SAPScript as Smartforms was not widely available or used in Finance. It was more available for modules like SD for their Customer Invoices and related outputs.

But today since the inception of S/4 HANA, SAP has introduced a newer, better and more user friendly technology called "Adobe Forms".

Before being able to use this technology, some technical pre-requisites need to be in place in your S/4 HANA environment which your Basis and infrastructure team will have to work on it first. For this to work, you will an ADS Server (Adobe Document Server) to be installed in your landscape. And this runs in JAVA, so you will need to install it in a JAVA based server. I know from the past that the PI/PO server was JAVA based, so a couple of clients were sharing it for both technologies. Once that is in place, then they will have to connect them and after that you will be able to start using it. If you try to use it without this being in place, you will get a lot of errors and you will not even be able to display a form nor create one.

It is funny that I have to highlight that, as one would think this should be standard out of the box for any S/4 implementation; but apparently it is not ... This year, I went into a client where another SI was kicked out for doing a terrible job, and among many of my findings were that these guys designed all the outputs by still using the old SAPScript technology and the ADS server was non-existent in the client landscape.

Note: Don't ask me more technical questions about the ADS server as I am just a Functional guy, not a Basis resource.

How do we use and deal with these forms in S/4 HANA ?

As we were used to before with SAP, they have delivered a series of standard forms for each of the available outputs for the different processes that we can always leverage to start from them and add / remove / modify them as we see fit as per client requirements. Like adding a logo, changing columns or adding extra information that is not standard delivered.

As usual and in proper development practices, you should "never" modify an SAP standard form. You should ALWAYS create a copy and work with your own custom form. 

To access these forms, you can use Tcode SFP and enter (or search) the form name that you want to work with.


In my example, I will be working with the Vendor Payment Advice form which is a typical form that we use in Finance for payments.

Then you go Display and you will start looking at the definition and design of the Form. 

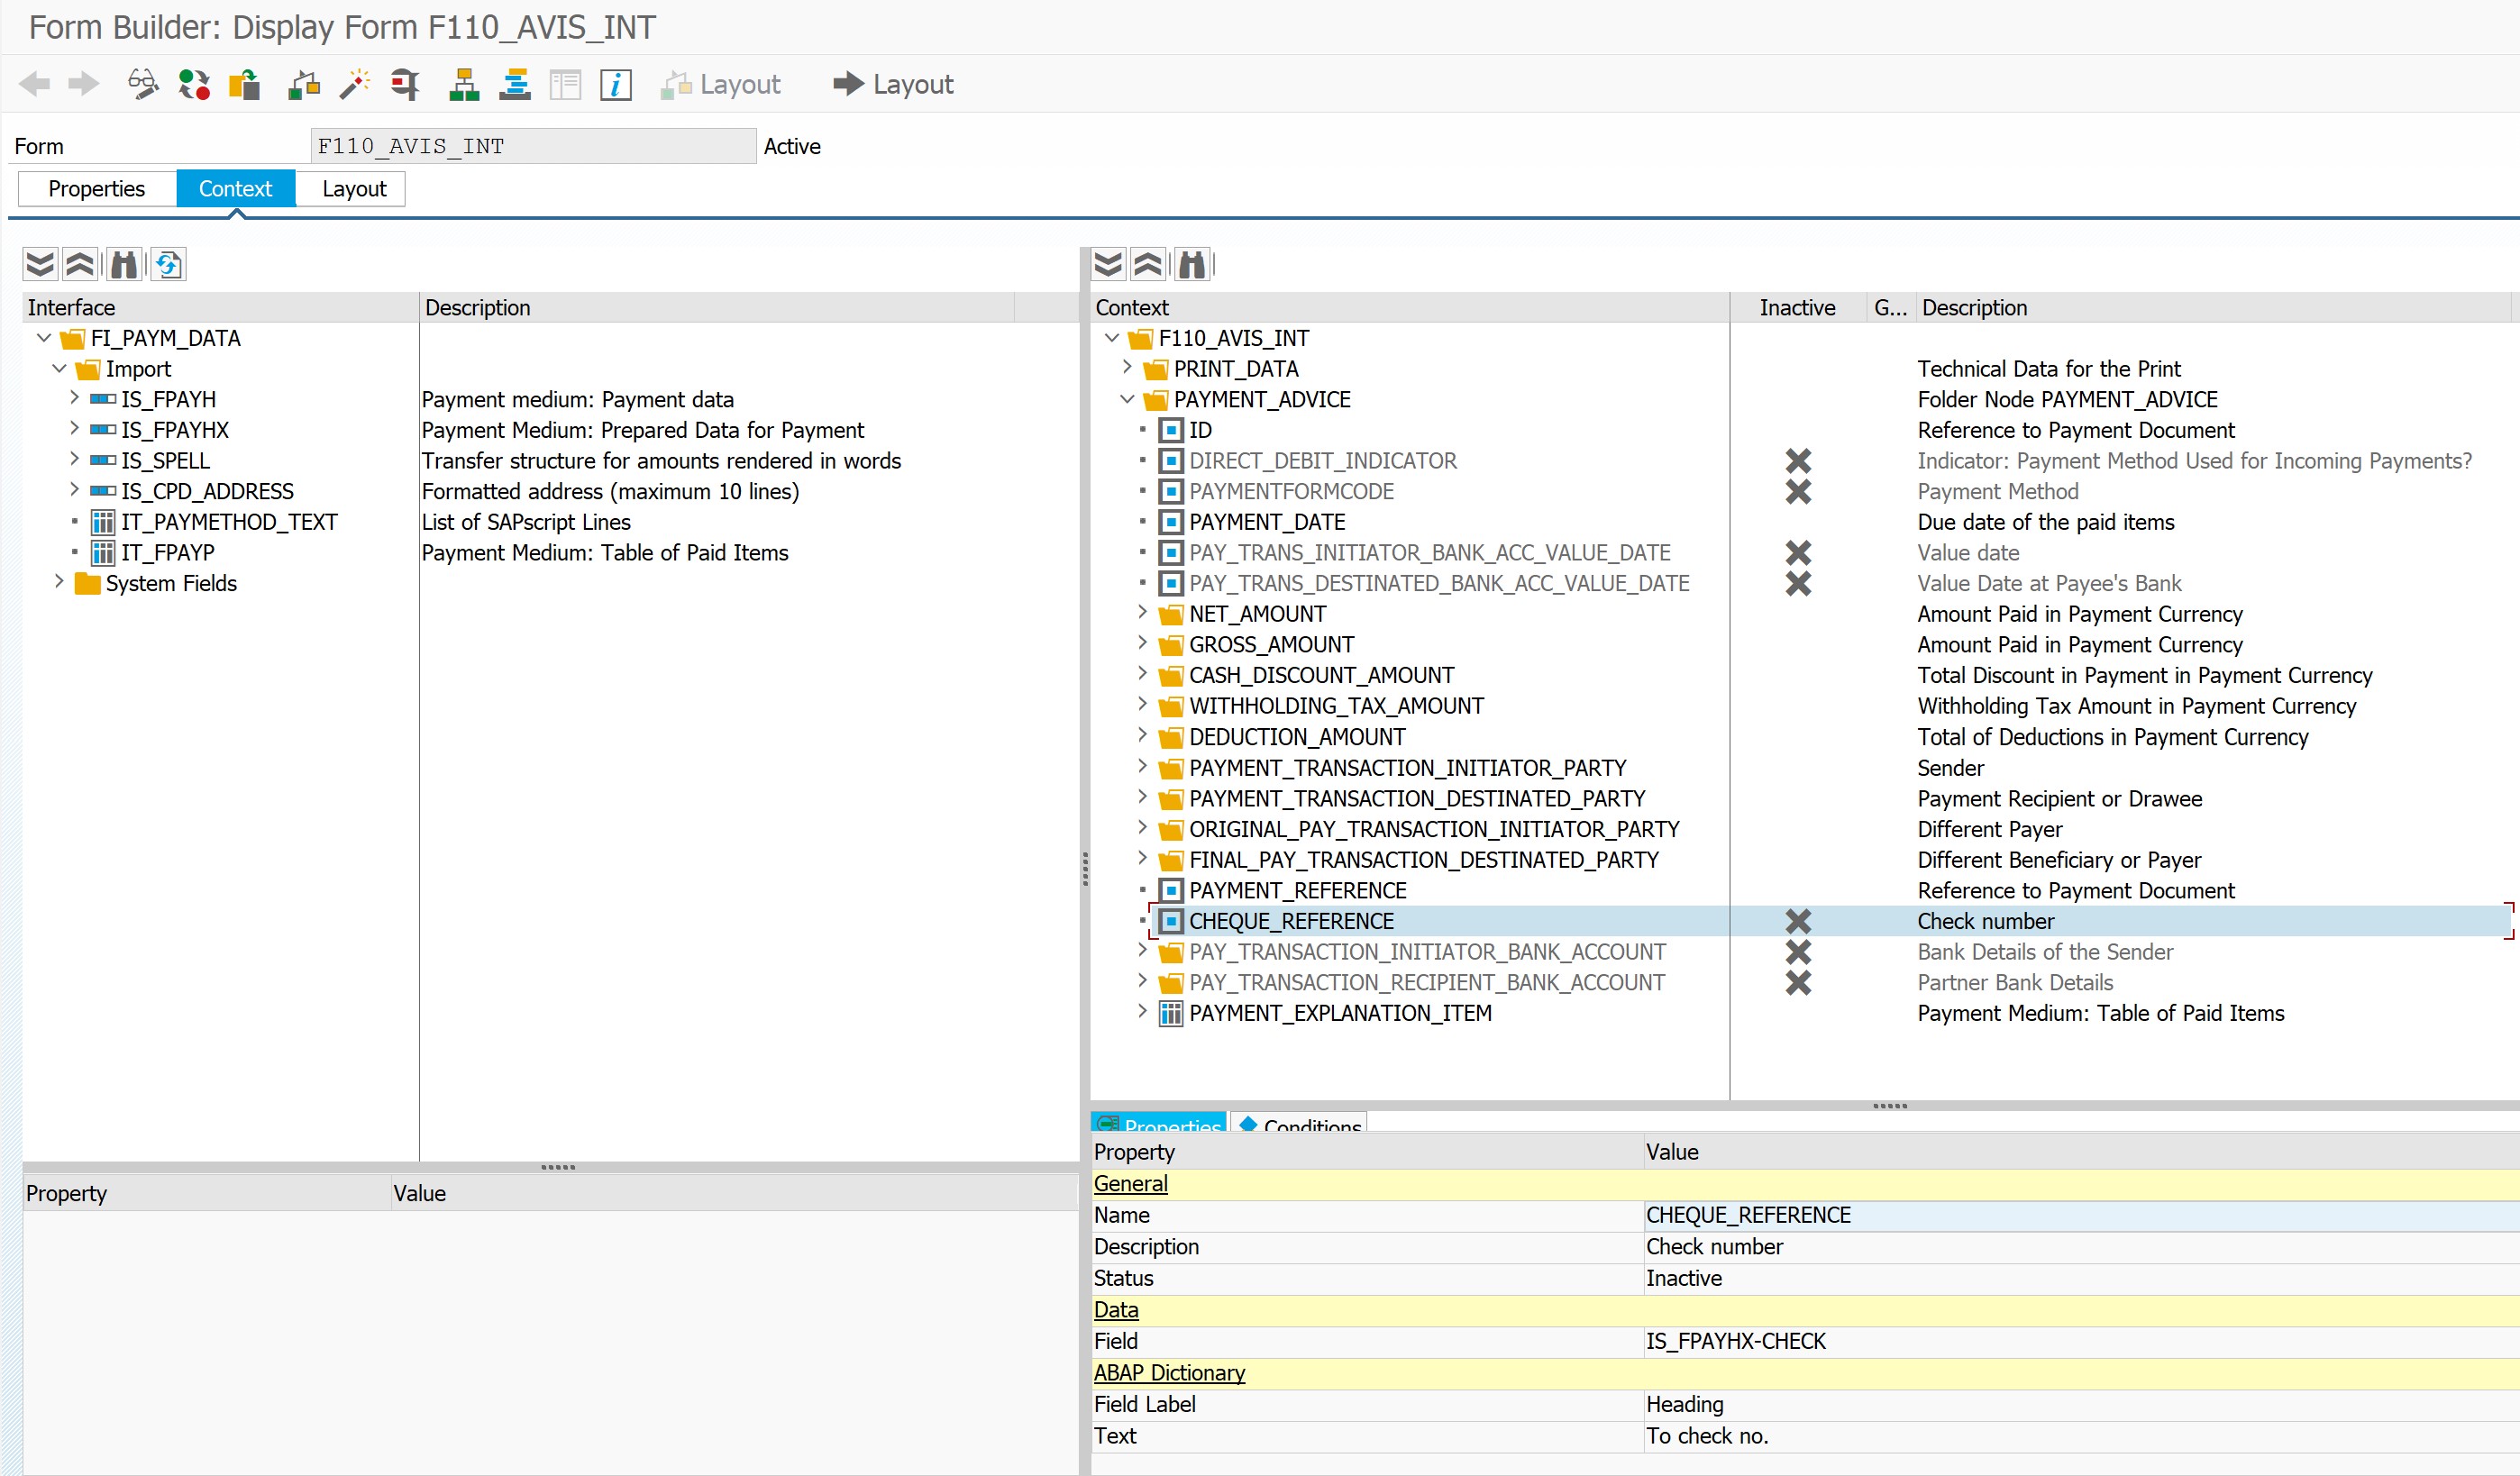
Within the Context tab, you will see a lot of the Structures that the form deals with and their individual fields that are available for the form to be added in the output. 


Here you can browse through the different Structures and fields and can take note of any extra fields that you might want to include in your customized form to add it to you Functional Specification document so then your Abaper can add them.
From my example (Payment Advice), you can clearly identify these structures as being the ones that are also available when we execute payments or when we build or deal with DMEE's. So any field that you want from those structures can be added to your form. There are fields at the header level and line item as usual. Same for any other forms for any other processes.

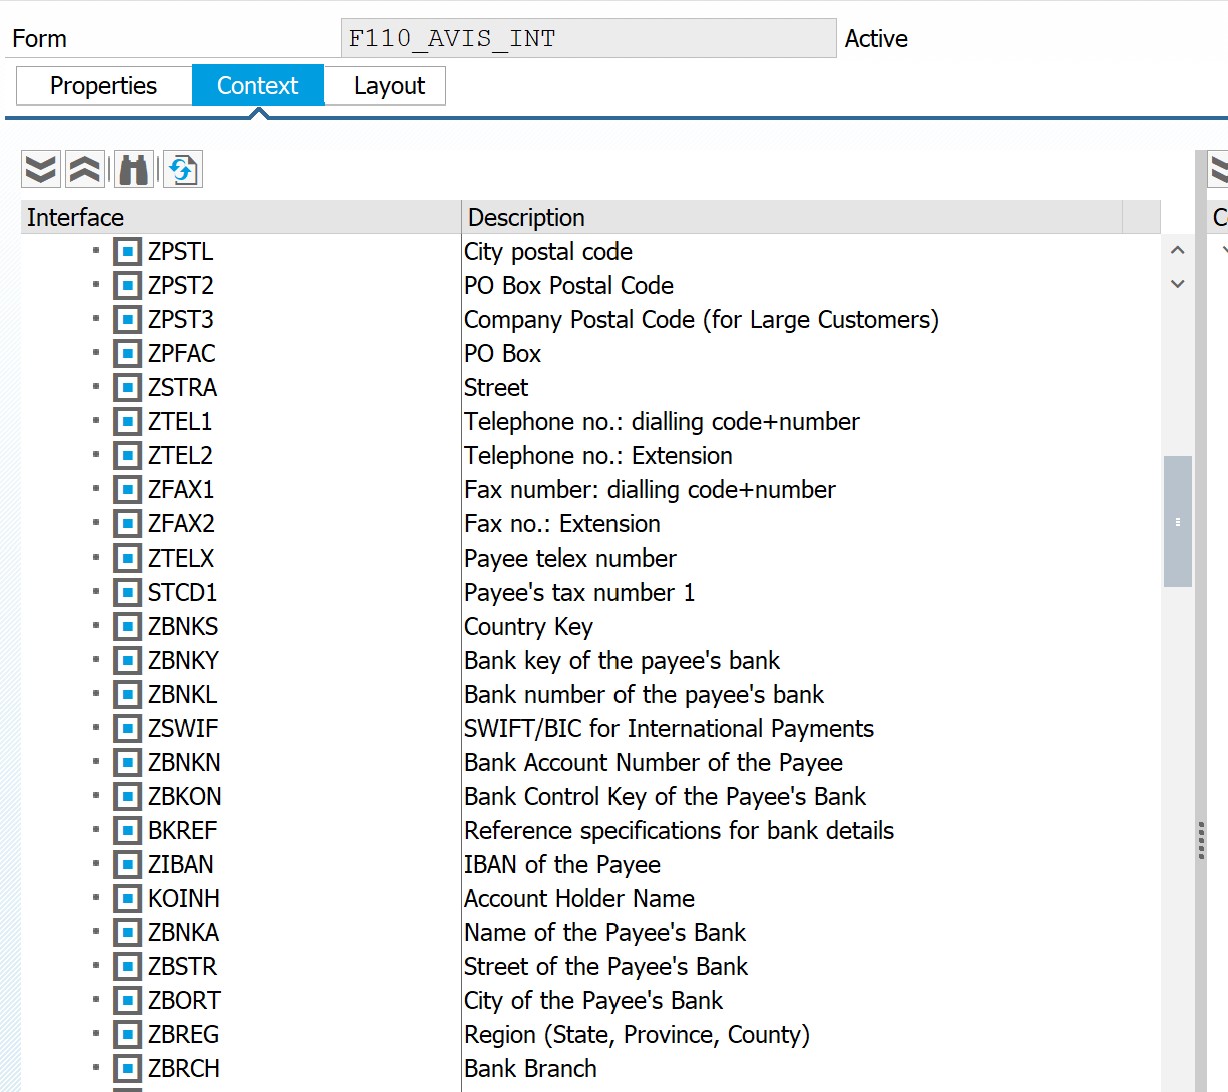
If for example, I want to add to my form "Payee Bank account #" and "Payee Bank Name", I just need to provide those technical field names (ZBNKN and ZBNKA) to be added to the form. 


Another possibility that you have, is to go to the Properties Tab and double click in the Interface name (Ex. FI_FPAYM_DATA). These will bring you another screen where you can then display the Structures definitions that we were seeing in the prior step in a more technical way as if you were displaying them in SE12.


Or, you can copy the Interface name and paste it right when you call Tcode SFP in the Interface field and display it. (Same result).

After you double click in any of the Type Name's for the Import Form Interface, you will see that structure the same way as you would see it in SE12 with all its technical definition, data type, length and so on ... Very useful when you want to see how big is the information you will be adding / removing to/from your form.

Next ... If you want to take a look at a draft layout of the final output form, you need to go back to the beginning to the "Layout" tab.

Before you are able to display the form layout in a PDF like way, you need to install Adobe Lifecycle Designer in your computer. In your own PC, not in the SAP server. Without that, you will not be able to display the form here in SFP. You can download it from the SAP Marketplace and then install it. 

Then you will see in the center of your screen, a little bit of a PDF display that also contains some technical information about the fields mapping (see below).


When you move to the left pane and drill down in parts of that hierarchy, the part that you are clicking on will get highlighted in the form just beside it in the central part of your screen. 
Also, if you see the right bottom pane, you will be able to see the field "binding" (field that is assigned to) for that field too.

All of these information will help you navigate through the form for you to do your analysis on which fields you need to add or remove from your form and provide a better Functional Specification Document (FSD) with detailed information and not just screen fields like I have seen many Functional consultants doing in the past (and still today ...).

Once your Developer finishes doing the changes in the form, you will just need to update the configuration for the process to include the new form name and it will be ready to be called by the system

Finally ...

What if I need to add fields that are not part of the structures that are available already in the form ?
What if I need to add custom logics to derive those fields or read other tables from other modules (Ex. SD or MM) ? How can I do that ?

In the past, to achieve this we needed to end up doing a Z / Custom program. Take a copy of the standard program and modify it as I mentioned earlier on.

Today with Adobe forms, there is NO MORE NEED TO CREATE A CUSTOM PRINT PROGRAM. If you see someone (Abap or functional) trying to repeat those old habits from the past. STOP HIM right away !!! That person has not updated his skills to S/4 HANA. 

There is absolutely no need for a Custom print program anymore. ZERO !!!

Any custom logics, fields, calculations, Abap code can be accommodated inside of the form where there is a section for you to put your own code, Form Routines and Data Definitions. I will not tell you how to do this part exactly because I am not an Abaper, but he should go back and investigate that as it is pretty simple to do in Adobe Forms.

Once he added the custom code to the form, you will be able to obtain the expected results and no SAP code would have been modified and this form will continue to be called by standard SAP programs.

This last part is really important, as I have passed through S/4 clients in the last years and I have seen Functional consultants that still asked for a custom print program and also delivered a form by using SAPScript. That should not be the approach for S/4 HANA anymore !

The technology stills exists and is still available for you to use it if you want. But you should not use it as you will be using old technology and not benefiting from the latest innovations. (Can you still work with a Monochrome amber or green screen ? for certain things probably yes. But there are better monitors now a days. So this is the same ...).


If your Company and/or Project needs to implement this, or any of the functionalities described in my Blog, or advise about them, do not hesitate to reach out to me and I will be happy to provide you my services.

Mar 29, 2022

Planning in S/4 HANA without breaking the bank ($$$)

How to do Planning in SAP has changed who knows how many times in the last 15 years. From Classic Planning using the CO Tables in ECC, then adding some sort of planning in BI with NWBC, SAP recommending BPC (Business Planning and Consolidation) and some other variations. Once S/4 HANA was launched, they started pushing for BPC Embedded for S/4 (around S/4 1610 version). Then "cloud season" started and they came up with SAC (SAP Analytics Cloud) which is the latest one that they want you to adopt. But for sure it does not come for free and you have to pay an extra fee / subscription to use this Cloud solution.


Now, if you do not want to break the bank and pay extra for a Cloud solution that you might not want. How do you do planning in S/4 HANA ?


Classic Planning using the old totals tables (Ex. CO Planning, Profit Center Planning, COPA KEPM Planning), it is not the preferred option for S/4. It comes already deactivated out of the box and you have to follow a couple of OSS Notes to re-activate that. Also the new series of Actual vs. Plan Fiori Apps, do not read those tables. So if you try to use them for reporting, they will not show you Plan data. There is a way around it to transfer the Classic planning figures so the Apps can report that data, but not the preferred one either (at least for me).


BPC Embedded for S/4 HANA, could be an option. SAP has recommended it at the time of S/4 version 1610 or 1709 but has moved away from it since and it is not recommending it anymore. In fact they have plan to sunset this one too. Also in order to use this option, you need to have an extra license for BPC Embedded ($$$). Not my preferred one either.


Finally, SAC - SAP Analytics Cloud for planning. It is the new kid on the block from SAP for Planning. More and more "planning stories" are being developed and released every year for it and it became a world on its own. SAP wants you to adopt it. For sure, it is extra ($$$) and you have to pay a subscription to be able to use it.


Now ... I have a solution that is hidden out there that is none of these 3 and will not cost you a penny and comes included as part of your S/4 HANA package and license. It is just a small configuration / activation change and it will become available for you.


The solution


The solution is based on the below 2 OSS Notes and an SAP Help link.


https://launchpad.support.sap.com/#/notes/2503495

https://launchpad.support.sap.com/#/notes/3033876


SAP Help Procedure to EDIT the variable INFOPROV

https://help.sap.com/viewer/74785309615c47a1b7497b1f8942ebd1/1809.001/en-US/3ceafc57bde70f70e10000000a44147b.html


From the Notes

1. The customer could – at system setup – set the default value for the variable /ERP/P_0INFOPROV to Info Cube or ACDOCP.


S/4 HANA out of the box, comes configured with the Info Cube option; which it translates into using BPC Embedded for planning. This is not an option that you would prefer, as it will require you to have an extra license.


If you set it up for ACDOCP, all the Actual vs. Plan Fiori Apps will work correctly and report Plan data.

Also you will be able to upload your Plan data using the Fiori App "Upload Plan Financial Data". This will store the data directly in Table ACDOCP. This applies for COPA Market Segments plan data, Cost Center, Profit Center, P&L, Balance Sheet Planning, Internal Orders, etc.


This App will allow you to plan outside (like in Excel), populate the loading template and then upload it in the App.


Step-by-step setup


Tcode RSPLAN


 Click in "Filter" and then in the Filter field, enter any filter which uses the variable /ERP/P_0INFOPROV, for example, any filter starting with /ERP/SFIN_xxxxx and select "Display"


Locate the InfoObject 0INFOPROV (InfoProvider) in the Selections screen area. Choose right next to the Restriction column the "puzzle" icon.
In the View field, choose Variables from the dropdown list


Choose the /ERP/P_0INFOPROV variable in the Variables of Single Values table. Then choose the "pencil" icon to modify.

Note: You are finally in the editing dialog of the /ERP/P_0INFOPROV variable.


Click in the "footprint and yellow arrow" icon twice to get to the Default Value(s) field. 


Choose the InfoProvider of your choice and confirm it


InfoProviders for Plan Data

You can use the following InfoProviders for storing plan data:

  • /ERP/SFIN_R01 S/4HANA Financials: InfoCube for Plan Data (this is S/4 out of the box and will use BPC Embedded for S/4, which we do not want to)

  • /ERP/SFIN_V20 S/4HANA Financials: Plan Data from ACDOCP
    Virtual InfoProvider which stores plan data records in the 
    ACDOCP table, which has almost the same structure as the ACDOCA table. (this is the one we want and that costs nothing ($$$) and does not require an extra license)
This solution will allow you to load data using Fiori App "Import Financial Plan Data" and execute all the reporting Fiori Apps that give you Actual vs. Plan data that will retrieve the uploaded data. If you do not modify this system variable, you Fiori Apps will show NO Plan data figures.

Note: This solution is not Transportable, it has to be done manually in each environment and you need the config to be open to do it.


If your Company and/or Project needs to implement this, or any of the functionalities described in my Blog, or advise about them, do not hesitate to reach out to me and I will be happy to provide you my services.

Jan 9, 2022

How to create a Fiori Tile for any traditional Tcode ?

Something funny happened to me last week ... I thought I have seen it all in terms of "bad SAP resources" but I keep on getting surprised everyday. I had to teach a "Fiori Consultant" how to create a Fiori tile for a standard traditional SAP GUI Tcode so we could execute it directly in Fiori. He/she should know that by hard as this is the bread & butter of Fiori ...

Creating a Fiori tile out of a standard Tcode is something easy if you have the accesses and permissions. In some cases, SAP has not delivered standard Catalogs and Security roles that will contain the Tcode that you are looking for and you will have to create a Custom Tile. Now a days, more and more projects get delivered with Fiori only accesses, which it should be the way to do it now. So, in those cases, you will need to create a Fiori Tile capable of executing a traditional SAP Tcode.

First thing you need to check, is how the Tcode is defined by SAP in its standard.

Execute Tcode SE91, enter the Tcode you want to convert into a Tile and click "Display" (Ex. F-29)


Down below in the "GUI Support" section, you need to check if your desired Tcode has activated the "SAP GUI for HTML" option. If it has, you will be able to call if from Fiori.


Then you will have to open the Fiori App Library and look for your Tcode as you will need to get certain information from there that it will be needed in subsequent steps.
https://fioriappslibrary.hana.ondemand.com/

Going back to your system, open your Fiori Launchpad Designer (not your regular Fiori Launchpad FLP link, this is the "Designer")


Click in "Catalogs" and click in "+" to add a new Catalog.

Assign a Title for your Custom Catalog and an ID, recommendation is to start with Z*. Then <Save>.
After that, click on "+" in the square to Add a Tile to the Catalog that you just created.

Here we will have to enter different information and parameters, some of them will be ones corresponding to your Tcode information from the Fiori App Library. 
From the searched Tcode in the Library, go to "Implementation Information" then "Configuration"


From there we will need to use "Semantic Object", "Semantic Action", "Parameters".

Now you will start completing the information in the Tile that you want to add.

Enter your desired Title for your Tcode, subtitle you can put the Tcode so you keep reference, keywords too. Icon you can give any icon you want from the list. Then enter the Semantic Object and Semantic Action from the Fiori App Library and the Parameters-value in Parameters. Once completed, click <Save>.

Next is to "Create the Target Mapping", On the top click in "Target Mapping" then at the Bottom part of the screen click on "Create the Target Mapping".


Here you will have to enter similar information that you collected from the Fiori App Library.


Semantic Object, Action, System Alias and Title. On Application Type, select "Transaction" and then on Transaction, enter your Tcode (Ex. F-29). You can also decide if you want this tile to be called on Desktop mode, tablet or even Phone. Then <Save>.

So in the 1st step you are assigning some information and in the 2nd you end up assigning the real Tcode. I know ... it seems repetitive, but it might have a reason, but I am not that much of a Fiori expert to tell you the difference. I just know enough to get around.

Once the Catalog has been created, we will create a Group where we can include this Tile or any other tile that exists out there from any other Catalog.

Click in "Groups" on top of the screen. Then "+" to add a Group.


Assign a Group Name and ID, in this case I kept it equal to the Catalog but it can be different. This Title is the one that will show in your Fiori Groups assigned to you when you will be navigating.

Click in the square "+" to add a new Group

Then look for your Group name created in prior steps. (Ex Z_AR... )

Once selected it will show you Tiles from that group and you just need to confirm / add them by clicking in the "+" underneath each Tile. Once it turns green, it means you added to the Group.

If you added one by mistake, you cannot unclick it. You need to drag and drop to the bottom right corner to delete it.

Now we have completed the Custom Catalog and Group creation. Next step is to create a Security role that will call them. You might not have enough Security accesses in your organization to create this and you might have to work with your Security person.

Execute Transaction PFCG, enter a Role Name (Ex. Z_AR_TEST_AD) and click in Single role.


Assign a description and <Save> the role. Then go to "Menu" tab, click on "Transaction" -> SAP Fiori Launchpad" and Catalog and Group. Assign the names of the Catalogs and Group you created in the prior steps in the Launchpad Designer. Save the role and get the role assigned to your SAP username.


The result will be that you have the Group "Customer - TEST AD" available within the Group lists in your Fiori Launchpad


Then the only Tile that I had added to my group (Ex. F-29) will appear.

Finally your F-29 Tcode can be executed as a GUI HTML from Fiori.


If your Company and/or Project needs to implement this, or any of the functionalities described in my Blog, or advise about them, do not hesitate to reach out to me and I will be happy to provide you my services.